Single Sign On (SSO) set up for Azure / Entra AD
The following article provides step-by-step instructions on how to set up Microsoft Azure / Entra as the SSO provider with your organization's Nitro Account.
Prerequisites:
To set up and enable SSO, your account must have a verified domain in the Nitro Admin portal.
You will need the following information from your Azure / Entra IdP:
- Sign In URL
- Access to the Nitro Admin portal
Steps to set up SAML SSO for Microsoft Azure AD / Entra:
Step 1: Login. Login to Microsoft Azure / Entra.
Step 2, Navigate. Navigate to Azure AD / Entra AD:

Step 3: Select. Select Enterprise Applications.
Step 4: New. Click New Application.
Step 5: Nitro. Search for Nitro:

Step 6: NPS. Select Nitro Productivity Suite and click "Add":

Step 7: Integration. Browse to Identity > Applications > Enterprise applications > Nitro Productivity Suite application integration page, find the Manage section. Select "single sign-on".
Step 8: SAML. On the Select a single sign-on method page, select SAML.
Step 9: Login URL. In the Set up Nitro Productivity Suite section, select the copy icon beside Login URL:

Note: To download the Certificate, please enter dummy values into the Azure / Entra portal fields under 'Identifier (Entity ID)' and 'Reply URL (Assertion Consumer Service URL)'. Azure / Entra will not allow the Download of the certificate until these aforementioned fields are populated. Once the dummy values have been inserted into these fields, the Certificate will be available to download. The real values for both of these fields will be given in the Nitro Admin portal in the proceeding steps.
The 'Identifier (Entity ID)' entry will have the following pattern: urn:auth0:gonitro-prod:<ENVIRONMENT>
The 'Reply URL (Assertion Consumer Service URL)' entry will have the following pattern: https://gonitro-prod.eu.auth0.com/login/callback?connection=<ENVIRONMENT>

Step 10: Download. Once the dummy values have been inserted, the Azure / Entra Certificate will be available to download:
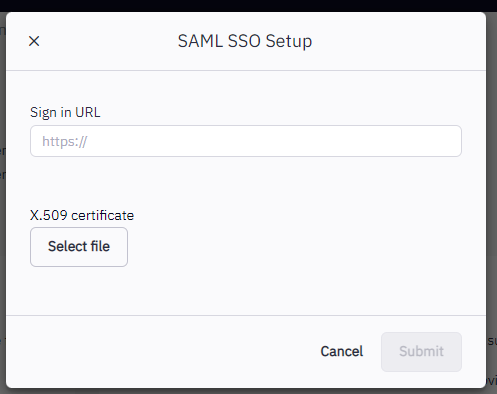
Step 11: SAML. Please navigate to the Nitro Admin portal, click the "Settings" option on the left-hand side, then the Single Sign-On tab. From there, please click the "Set up SAML" option. The following prompt will be seen:

Under Sign in URL, paste the "Login URL'" from your Azure AD / Entra portal.
Upload the Certificate that you just downloaded in the previous step from your Azure AD / Entra portal.
Step 12: Paste. After entering in the above fields, the SAML Entity ID and ACS URL fields will be populated within the Nitro Admin portal. Please copy both of these fields and enter them back into the Azure AD / Entra portal under "Identifier (Entity ID)" and "Reply URL (Assertion Consumer Service URL)":

Step 13: URL. In the Sign-on URL text box, paste the URL: https://sso.gonitro.com/login
Step 14: Attributes. The Nitro Productivity Suite application expects the SAML assertions to be in a specific format, which requires you to add custom attribute mappings to your SAML token attributes configuration. The following screenshot shows the list of default attributes. The employeeNumber attribute is not a requirement and can be omitted from your configuration.

Notes:
- Attribute Names passed along to Nitro need to be fully qualified. Please ensure your Attributes & Claims section looks like something similar to the following:

As an example, user.surname would have the Claim name of: http://schemas.xmlsoap.org/ws/2005/05/identity/claims/surname
Please use the Azure ?picker? for populating of the xmlsoap claim names.
Step 15: Download. Once the above has been completed, redownload the Certificate from your Azure AD / Entra portal, as the Certificate will have changed within your Azure AD / Entra portal from the initial download. Once downloaded, please upload it again into the Nitro Admin portal, repeating step 11. The Sign-in URL will need to be provided again as well.
The SAML Entity ID and ACS URL fields in the Nitro Admin portal will remain the same and do not need to be copied again.
Step 16: User. Assign a user to the Nitro Productivity Suite Azure AD / Entra group.
Step 17: Enable SSO. Once assigned, return to the Nitro Admin portal, then toggle on the "Enable Single Sign-On" option in the Nitro Admin portal:

Step 18: Incognito. Open an incognito browser and test the SSO connection to Nitro via the following URL: www.cloud.gonitro.com
By following the above steps, users can successfully set up Microsoft Azure / Entra as the SSO provider for their Nitro Account.
For additional support or to report issues:
- Submit a Support Ticket here: www.gonitro.com/support/ticket
- Post on the Community Forum here: Nitro Community Forum